5 Polka Dot Nail Designs

We may earn a commission for purchases made using our links. Please see our disclosure to learn more.
Polka Dot Nail Designs are simple, playful, and easy to customize for any style. Whether you like classic black and white, soft pastels, minimal nude nails, or colorful confetti dots, this nail art trend gives your manicure instant personality without feeling complicated. In this guide, you’ll find five polka dot nail ideas, practical styling tips, product suggestions, and simple nail care advice to help you create a polished look at home or choose your next salon design.
Why Polka Dot Nails Always Work
Polka dots are simple, but they add instant personality to your nails. They can be soft and feminine, bold and graphic, or clean and modern.
They suit nearly any nail length, from short natural nails to longer shaped styles. Short nails look cute with tiny dots. Longer almond, square, or coffin nails give you more room to play with patterns and color.
Another reason polka dot nail designs stay popular is their flexibility. Pastel dots feel fresh for spring. Black and white dots look classic year-round. Gold or pearl dots can even feel dressy enough for parties or weddings.
For more soft and elegant manicure ideas, you may also like these wedding nail designs.
Before You Start: Easy Tips for Cleaner Dots
A neat dot manicure starts with good prep. First, shape your nails and smooth the edges. Try to file in one direction instead of sawing back and forth, which can weaken the nail.
Next, apply a base coat. This helps polish go on smoothly and can reduce staining from darker colors.
Use light coats when applying your base shade for a cleaner finish. Thick layers may cover faster, but they take longer to dry and can smudge more easily.
Allow the base polish to dry fully before placing the dots. If the polish is still tacky, your dotting tool may drag the color instead of making a clean circle.
To create the dots, place a little polish on foil or a small palette. Dip your dotting tool into the polish, then lightly tap it onto the nail. You do not need much pressure.
Finish with a top coat once the dots have had time to set. Apply it gently so the design does not streak.
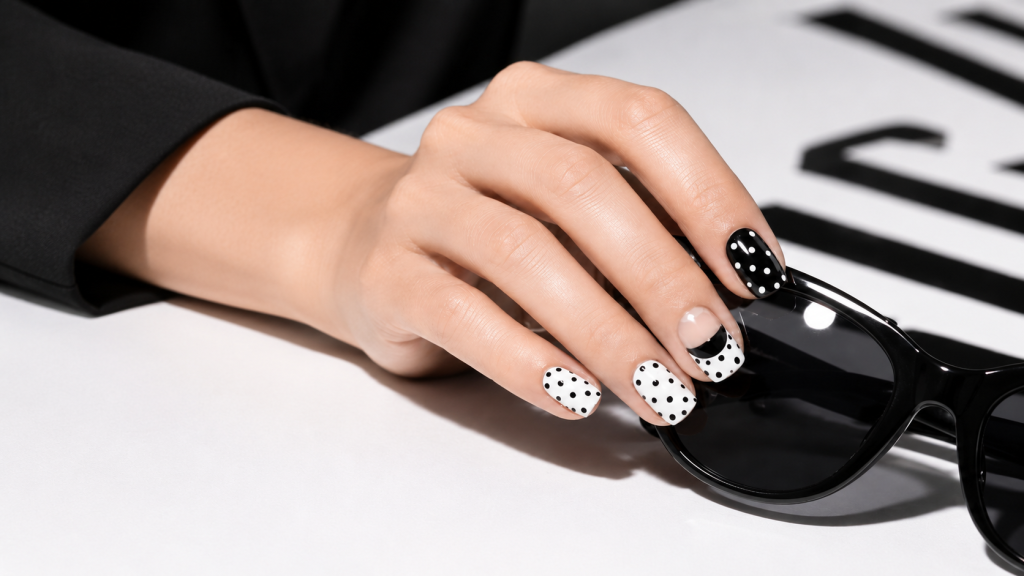
1. Classic Black and White Polka Dot Nails
Black and white polka dot nails are simple, bold, and always stylish. They have that fun retro feel, but they still look clean and modern.
The easiest version starts with a white base and black dots. Apply two thin coats of white polish, let them dry, then add evenly spaced black dots.
For a moodier look, reverse the colors. A black base with white dots feels more dramatic and works beautifully on short square nails or almond nails.
You can also use this design as an accent. Paint most nails solid black or white, then add dots to one or two nails on each hand.
Best for: retro looks, everyday manicures, short nails, and bold minimalist style.
Style tip: Keep the dots similar in size for a polished look. For a more playful design, mix small and medium dots on purpose.
2. Pastel Polka Dot Nails
Pastel polka dot nails are soft, cheerful, and easy to wear. Think baby pink, lavender, mint green, butter yellow, peach, or powder blue.
One cute idea is to paint each nail a different pastel shade, then add white dots on top. This creates a sweet, colorful manicure without looking too loud.
For a softer version, use a sheer pink or nude base. Then add pastel dots near the tips or along one side of each nail.
Pastel dots also look beautiful over a milky white base. The white keeps the manicure clean, while the pastel colors add a fresh pop.
Best for: spring nails, brunch looks, baby showers, soft feminine style, and short natural nails.
Style tip: Choose pastels with a similar softness. If one shade is too neon, it may overpower the rest of the design.
3. French Tip Polka Dot Nails
French tip polka dot nails give a classic manicure a fun twist. They feel clean, elegant, and a little playful.
Begin with a nude, soft pink, or milky-toned base color. Then paint your French tips in white, black, red, pastel, or any color you like.
Once the tip dries, add tiny dots along the smile line. This small detail makes the manicure feel more decorative without making it too busy.
You can also create the French tip using dots only. Place small dots in a curved line across the tip of each nail. Add a second row of smaller dots if you want extra detail.
This style works especially well on almond, oval, and squoval nails.
Best for: clean manicures, office-friendly nails, date nights, bridal showers, and simple nail art lovers.
Style tip: Use a fine dotting tool. Large dots can make the tip look crowded, especially on shorter nails.
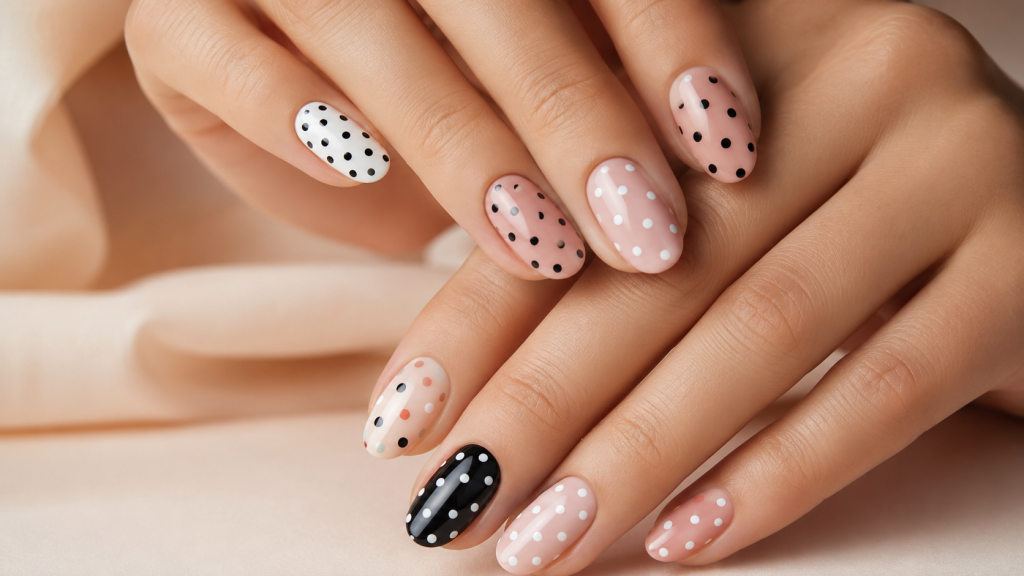
4. Minimal Nude Polka Dot Nails
Minimal nude polka dot nails are chic, subtle, and easy to wear every day. They prove that dot designs do not have to look childish.
Start with a nude polish that suits your skin tone. Then add one small dot near the base of each nail. Black, white, gold, or deep brown all work well.
For a more modern look, place three tiny dots in a vertical line down the center of each nail. It almost gives the effect of delicate nail jewelry.
You can also place dots on only one side of the nail for a clean asymmetrical style.
This design is perfect if you want nail art that still feels polished, neutral, and low-maintenance.
Best for: minimalist style, office manicures, neutral outfits, short nails, and everyday wear.
Style tip: Use a glossy top coat for a classic finish or a matte top coat for a more editorial look.
5. Colorful Confetti Polka Dot Nails
Colorful confetti polka dot nails are bright, fun, and full of personality. They look like tiny party sprinkles on your fingertips.
Choose a clear, nude, sheer pink, or white polish as your starting base. Then add dots in several colors across each nail.
You can use rainbow shades, neon polish, metallic dots, or a simple three-color palette. Pink, orange, and yellow feel warm and sunny. Blue, lavender, and mint feel soft and dreamy.
The key is to leave space between the dots. Too many dots can make the design look messy. A scattered pattern feels more balanced and playful.
For a cleaner version, use only three colors instead of many. This keeps the manicure fun but still coordinated.
Best for: birthdays, vacations, summer nails, festivals, and cheerful everyday manicures.
Style tip: Mix dot sizes to create a real confetti effect. Start with medium dots, then fill gaps with tiny ones.
Recommended Products for Polka Dot Nail Designs
You do not need a huge nail kit to create polka dot nail designs. A few simple tools and polish shades can make the process much easier.
- Artdone Nail Dotting Tools 6PCS – This set helps you create different dot sizes. It is a great beginner-friendly tool for cleaner circles.
- Beetles 31pcs Nail Art Brushes and Dotting Tools – The set comes with dotting tools, liner brushes, and fine detail brushes for nail art. It works well if you want to try more nail art styles later.
- OPI Nail Lacquer in Alpine Snow – A crisp white polish is useful for both base colors and clean white dots.
- essie Nail Polish in Licorice – A glossy black polish is perfect for classic black dots, accent nails, and black-and-white designs.
- Seche Vite Dry Fast Top Coat – A strong top coat helps protect your design and adds shine. Apply it lightly to avoid smearing the dots.
Nail Care and Safety Notes
Cute nails are fun, but healthy nails matter too. Do not trim your cuticles too much or push them back roughly. Cuticles help protect the nail root, so damaging them can lead to irritation.
Also, give your nails a break if they feel thin, sore, or brittle. Nail polish is usually fine for occasional use, but gel polish, acrylics, adhesives, and harsh removers can cause problems when used too often or removed incorrectly.
A 2024 review on adverse effects of DIY nail cosmetics found that allergic contact dermatitis is one of the common issues linked to at-home nail products, especially those containing certain acrylates.
That does not mean you need to avoid nail art. It simply means you should use products as directed, avoid getting polish or gel on the skin, and stop using anything that causes redness, itching, burning, or swelling.
For everyday nail care, the American Academy of Dermatology’s nail care tips are also helpful. Simple habits like gentle filing, clean tools, and careful trimming can make your manicure look better and last longer.
Conclusion
Polka Dot Nail Designs are simple, cute, and easy to customize. You can keep them classic with black and white, make them soft with pastels, dress them up with dotted French tips, or keep them modern with tiny dots on nude polish. Start with a clean base, use a dotting tool, let each layer dry, and finish with top coat. With just a few small dots, you can create a manicure that feels fresh, fun, and completely your own.
FAQs
1. Are polka dot nail designs easy for beginners?
Yes. Polka dot nail designs are one of the easiest nail art styles for beginners. You only need polish, a dotting tool, and a little patience.
2. What can I use if I do not have a dotting tool?
You can use a toothpick, bobby pin, sewing pin, or the rounded end of a makeup brush. A dotting tool gives cleaner results, but household items can still work.
3. How do I stop my dots from smearing?
Let the dots dry before adding top coat. Then apply the top coat gently. Try to float the brush over the nail instead of dragging it across the design.
4. Do polka dot nails work on short nails?
Yes. Small dots look great on short nails. Try one dot near the cuticle, tiny dots over pastel polish, or a dotted French tip.
5. What colors look best for polka dot nails?
Black and white is the most classic choice. Pastels, nude shades, metallic dots, and rainbow colors also work well. Choose colors based on the mood you want: soft, bold, elegant, or playful.