Simple Christmas Nails You Can Do At Home

We may earn a commission for purchases made using our links. Please see our disclosure to learn more.
Christmas is the perfect excuse to add a little sparkle to your nails. From classic red polish to tiny snowflakes, festive manicures can be surprisingly easy to create at home. A few seasonal colors and basic techniques are all it takes to give your nails a festive touch. You can keep things subtle with a little glitter or have fun with playful holiday patterns. Here are eight simple Christmas nail ideas you can try at home, plus easy tips and product suggestions to help you get the look.
What You Need for Christmas Nail Art at Home
Before getting started, gather a few basic supplies. You don’t need an entire nail art kit to create cute Christmas designs, just a handful of products that make painting and decorating easier.
Here are the essentials:
- Base coat: Helps create a smooth surface for your nail polish and may help prevent staining.
- Festive nail polish colors: Classic holiday manicures often feature shades of red, green, white, and gold.
- Nail art brushes: Fine brushes, make it easier to paint Christmas trees, thin stripes, and tiny festive details.
- Dotting tools: Nail Art Dotting Tools are handy for creating ornaments, snowflakes, and colorful polka dots. A clean toothpick also works for smaller details.
- Top coat: Finish with a clear polish to add shine and help protect your design.
- Nail polish remover and cleanup brush: Keep these nearby to tidy up smudges or polish around your nails.
Once your supplies are ready, start with clean, dry nails and gently file any uneven edges. Avoid cutting your cuticles, as they help protect the area around your nails.
8 Easy Christmas Nail Designs to Try
Looking for a festive manicure you can recreate without spending hours painting tiny details? These easy Christmas nail designs range from classic holiday colors to cute patterns that only need a few simple tools.
1. Classic Red Nails With Gold Accents
A rich red manicure with a touch of gold shimmer is a timeless holiday favorite.
Start with two thin coats of your favorite red polish. Once dry, add gold glitter to your ring finger or a tiny gold dot near each cuticle for a subtle accent.
Deep cranberry red gives a more elegant finish, while bright cherry red feels fun and festive.
2. Candy Cane Stripes
Give your manicure a playful Christmas twist with stripes inspired by peppermint candy canes..
Apply a coat of white nail polish and wait until it’s fully dry before adding the details. Using a thin nail art brush, draw diagonal red stripes across one or two nails. Mix thick and thin lines for that familiar candy cane look.
Not confident painting straight lines? Nail striping tape can help you get cleaner edges.
3. Snowflake Accent Nails
Tiny white snowflakes look especially pretty against pale blue, navy, or nude polish.
Paint your nails in your chosen base color, then use a fine brush to draw three white lines crossing at the center of one nail. Add tiny branches to the ends to give your snowflake more detail.
Keep the other nails simple, or add a little silver glitter for an icy winter look.
4. Christmas Tree Nail Art
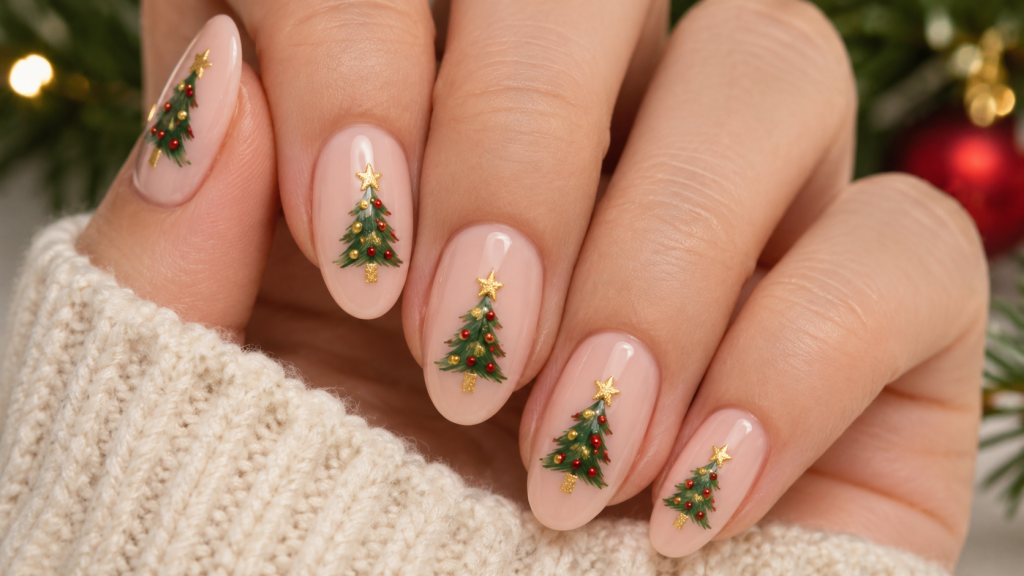
Why not add a tiny Christmas tree to your manicure?
Start with a nude or soft pink base. Use green polish to paint a small triangle, then add a gold dot at the top for the star.
For an easier approach, paint three short horizontal green lines, making each one slightly longer as you move down. Finish with a few colorful dots to look like Christmas ornaments.
5. Red and Green Polka Dots
If you’re new to nail art, red and green polka dots are a great place to start.
Choose a white, nude, or sheer pink base, then use a dotting tool to scatter small red and green dots across your nails. Mix up their sizes and spacing to make the design more playful.
You can keep the dots on one accent nail or decorate the whole set. This technique also works beautifully for other minimalist nail art ideas.
6. Festive French Tips
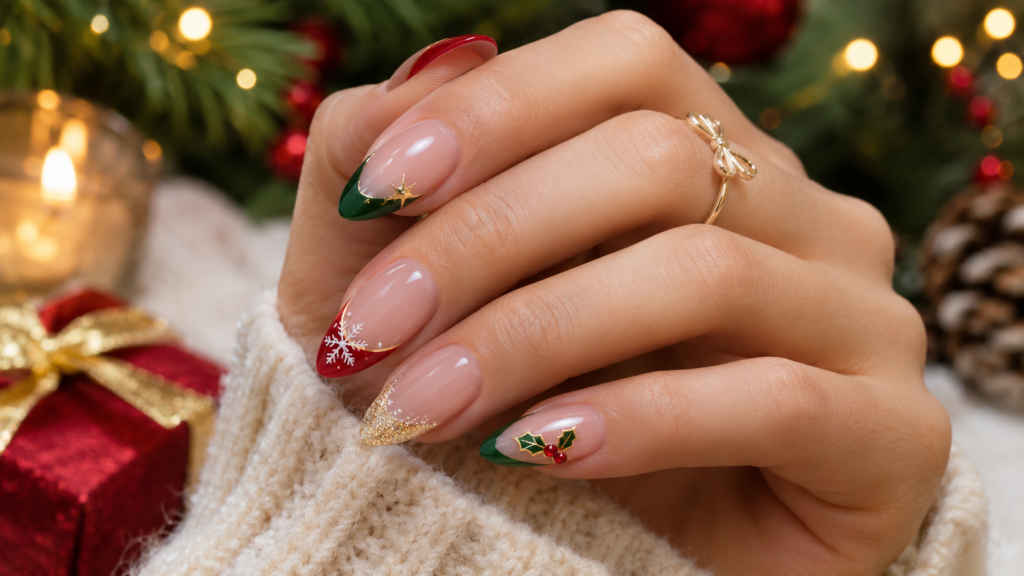
Give the classic French manicure a Christmas makeover by swapping white tips for festive colors.
Start with a sheer pink or nude base, then paint the tips red, forest green, or metallic gold. You can alternate colors on each nail or stick with one shade for a cleaner look.
A fine nail art brush makes it easier to create neat, narrow tips, especially on shorter nails.
7. Glittery Christmas Nails
Sometimes, a little glitter is all you need to make your nails Christmas-ready.
Choose a deep red, burgundy, or emerald green polish as your base. Once dry, add gold or silver glitter to one accent nail or lightly brush it over the tips.
Fine shimmer gives a softer sparkle, while chunkier glitter creates a bolder party look.
8. Minimalist Christmas Stars
Tiny gold stars are perfect when you want something festive without going overboard.
Start with a nude or sheer pink base. Using a fine brush, paint a small gold cross, then add two shorter diagonal lines through the center to create a sparkling star.
One star on each accent nail is enough to make the design stand out. You can also use gold star nail stickers if you prefer to skip the freehand painting.
How to Create a Christmas Manicure Step by Step
Once you’ve chosen your design, follow a basic application routine.
- Prepare your nails. Take off any existing nail polish, clean your hands, and make sure your nails are completely dry before starting.
- Shape the edges. Gently file your nails into your preferred shape without overbuffing the surface.
- Apply base coat. Use a thin layer and allow it to dry as directed.
- Paint your background color. Apply thin, even coats instead of one heavy layer.
- Add your Christmas design. Start with larger shapes before painting smaller details.
- Finish with top coat. Wait until your artwork is sufficiently dry to avoid smearing it.
Keep your painting hand supported on a flat surface for better control when adding small details.
If you’re new to nail art, practice your design on paper or a nail practice tip before painting your nails.
Tips for Making Your Christmas Nails Last Longer
Even a simple manicure benefits from careful preparation and maintenance.
Apply polish in thin layers and avoid painting directly onto the surrounding skin. Thick polish may take longer to dry and can become uneven.
Gently brushing top coat along the free edge may help reduce premature tip wear, although results depend on the polish and your daily activities.
Wear gloves when washing dishes or using household cleaners, and avoid picking at chipped polish.
Nail health matters, too. The American Academy of Dermatology’s manicure safety guidance recommends moisturizing nails after polish removal and avoiding cutting cuticles.
The FDA’s nail care product safety guidance also emphasizes following product instructions and using nail products in well-ventilated spaces.
If a product causes irritation, stop using it rather than continuing your manicure.
Conclusion
Simple Christmas nails let you enjoy festive nail art without complicated techniques or salon appointments. Start with something manageable, such as red polish with a glitter accent or tiny green and reddots. Once you’re comfortable, experiment with candy cane stripes, Christmas trees, or snowflake details. A few seasonal colors, basic tools, and a little patience can turn your next at-home manicure into a cheerful holiday look.
FAQs
Which Christmas nail designs are easiest to recreate at home?
Solid red nails, glitter accents, polka dots, and colored French tips are among the easiest options. They require minimal tools and little freehand painting.
Which Christmas nail art ideas work well on shorter nails?
Small dots, thin French tips, miniature trees, and single snowflakes look great on short nails. Keeping details small prevents the design from appearing crowded.
Which nail polish shades are popular for Christmas manicures?
Classic Christmas manicures often combine red and green with touches of white, gold, or silver. Burgundy, champagne, navy, and soft pink also work well for more understated holiday manicures.
Can I make Christmas nails without nail art tools?
Yes. A toothpick can create small dots and simple details, while carefully placed striping tape helps with straight lines. Use clean tools and avoid pressing sharp points into your nails or skin.
How long do DIY Christmas nails usually last?
Regular polish may remain presentable for several days to about a week, depending on the formula, application, and daily activities. A suitable base coat, thin polish layers, and a protective top coat can help reduce early chipping.